Visit a nearby hardware store and invest into several light bulbs. Stop when you see a clear picture without cardboard being visible. If you want to get perfect results from light box photography, find light bulbs with a cool white color. You may download Lightroom presets for product photography and make it in several clicks. Locate the white poster board or a thick sheet of white paper on the upper part of the DIY light box. Search for such a board at the nearby craft shop, it doesn't cost much. Always cut away from yourself and from your hands. All detailed with a list of all the necessary items required. Yes, taking professional product photos with your smartphone is absolutely possible. We use cookies to make wikiHow great. However, you'll likely need something stronger than a box cutter, such as a saw, to cut the lighting panels in the side. Thanks for your excellent presentation on how to build a light box. diy box lighting cardboard background inside light handmadeology visit creating craftgawker I advise you the white poster board. Try using different colors to get different cool effects. Measure 2 inches from the edge of one of the cardboard squares. Check out how to create a DIY Light Box by using common materials such as a light cardboard box, tapes and paper, and see the sample output shots after using it! You must be sure that equipment is steady enough. Remove distracting yellow and green colors and make product photos clear with the help of this free Lightroom preset. This is such an easy, inexpensive way to improve your product photography for your blog, Instagram, or online store. But good product photos are probably the most important part of your online store.Below, weve put together some of the basic techniques that will improve your online store product photography, as well as step-by-step tips to create your own DIY light box and DIY product photos. Check it out! Cut the poster board to the width of the box. Measure 2 inches from the edge of one of the cardboard squares. cardboard lamp cube recycle junk boxes into recycled stylish lampshade simple super corrugated using light lamps shade lampshades recycling carton Such paper first appeared in Bristol, England. I found it. You dont have to worry about making this perfectas you can see, mine is free-handed and a bit messy. Choose product photos you need to edit and remove all imperfections caused by poor light and distracting shadows. This article received 25 testimonials and 100% of readers who voted found it helpful, earning it our reader-approved status. Professional Photographer. 1-2 min). Natural light is always preferable to artificial light. ", also mentioned not to use cheesecloth for the white material. 
 Instead, pay attention to Daylight fluorescent light bulbs which cost no more than $7 apiece. Thanks for your support! Best viewed in IE10+, Chrome, Firefox, Safari, professional table top fluorescent lighting, How to Create a Sparkly Background with Bokeh Circles for Pretty Trinket Pictures. A light box evenly distributes light so that your product photography has soft lighting. Change your table background on canvas in several clicks. Cut the tissue paper to the approximate size of the sides of the box (leaving edges that can be taped down). If you can't get the item or your camera positioned just right, you can always crop the photo to remove anything you don't want to be seen. The answer lies in the use of different lighting placed at various angles and distances to ensure that the products are well-lit on all sides. The same must be done to all the windows of the photo light box. The main thing you should have before setting proper camera settings is a tripod. Keep in mind the following tips: Nowadays, you dont need professional equipment in order to take great product photos. Make your own lightbox and start taking professional product photos at home without hiring an expensive product photographer.
  Put your product in it, take a picture, and you get a professional product photo with good lighting, no shadows, and a plain background. For an excellent result, it's better to find shirts of the matching color. White poster board will give you an easy "infinity" look as if the item you are photographing is sitting in an empty space. {"smallUrl":"https:\/\/www.wikihow.com\/images\/thumb\/e\/eb\/Create-an-Inexpensive-Photography-Lightbox-Step-1.jpg\/v4-460px-Create-an-Inexpensive-Photography-Lightbox-Step-1.jpg","bigUrl":"\/images\/thumb\/e\/eb\/Create-an-Inexpensive-Photography-Lightbox-Step-1.jpg\/aid114974-v4-728px-Create-an-Inexpensive-Photography-Lightbox-Step-1.jpg","smallWidth":460,"smallHeight":259,"bigWidth":728,"bigHeight":410,"licensing":"
License: Creative Commons<\/a> License: Creative Commons<\/a> License: Creative Commons<\/a> License: Creative Commons<\/a>
\n<\/p>
\n<\/p><\/div>"}, {"smallUrl":"https:\/\/www.wikihow.com\/images\/thumb\/9\/9e\/Create-an-Inexpensive-Photography-Lightbox-Step-9.jpg\/v4-460px-Create-an-Inexpensive-Photography-Lightbox-Step-9.jpg","bigUrl":"\/images\/thumb\/9\/9e\/Create-an-Inexpensive-Photography-Lightbox-Step-9.jpg\/aid114974-v4-728px-Create-an-Inexpensive-Photography-Lightbox-Step-9.jpg","smallWidth":460,"smallHeight":259,"bigWidth":728,"bigHeight":410,"licensing":"
\n<\/p>
\n<\/p><\/div>"}, {"smallUrl":"https:\/\/www.wikihow.com\/images\/thumb\/f\/f0\/Create-an-Inexpensive-Photography-Lightbox-Step-10.jpg\/v4-460px-Create-an-Inexpensive-Photography-Lightbox-Step-10.jpg","bigUrl":"\/images\/thumb\/f\/f0\/Create-an-Inexpensive-Photography-Lightbox-Step-10.jpg\/aid114974-v4-728px-Create-an-Inexpensive-Photography-Lightbox-Step-10.jpg","smallWidth":460,"smallHeight":259,"bigWidth":728,"bigHeight":410,"licensing":"
\n<\/p>
\n<\/p><\/div>"}, {"smallUrl":"https:\/\/www.wikihow.com\/images\/thumb\/e\/e2\/Create-an-Inexpensive-Photography-Lightbox-Step-12.jpg\/v4-460px-Create-an-Inexpensive-Photography-Lightbox-Step-12.jpg","bigUrl":"\/images\/thumb\/e\/e2\/Create-an-Inexpensive-Photography-Lightbox-Step-12.jpg\/aid114974-v4-728px-Create-an-Inexpensive-Photography-Lightbox-Step-12.jpg","smallWidth":460,"smallHeight":259,"bigWidth":728,"bigHeight":410,"licensing":"
\n<\/p>
\n<\/p><\/div>"}. Your lights should be an even distance from the lightbox when you first turn them on. 10 Best Cameras for Product Photos to Capture Professional Shots, Homemade Photography Studio Tutorial: Product & Portrait. It should be available at your local craft store for a low price. The same must be done on the opposite side.  If you have a big window, for example, position your product so that the daylight falls on it from one side. Here are more ideas for taking your own product pictures and getting the right set up. But that doesnt mean that you have to illuminate your product in a boring and sterile way. Rights Reserved. If you are thinking of setting up DIY light box photography, be mindful of high-quality lighting for the photo shoot. Don't forget to measure the size of the box when purchasing fabric it must be enough to cover the whole box. All you have to do is to arrange a number of low-cost lamps and attach diffusing boards to a cardboard box. Add the natural luxury design trend to your product photo backgrounds. Customers also like seeing a product in its natural environment. Think about what could be important for your customers: Are there important details that your viewers should absolutely see? For the sample we produced for this article, we used a regular 39cm x 26cm x 29cm box, which is suitable for photographing small to medium-sized products. shadowbox shewearsmany clementineorigami backlit Then, adjust the 2-second timer or a remote shutter release. From the inside, used clear packing tape to secure tracing paper overlapping each window, Made small loops of tape (couple inches wide) to hold up the white poster board to the back of the box interior, Tracing paper nominal because its on a huge roll but well estimate 50 cents, Walmart Mainstays LED Desk Lamp $11.94 for two (3rd lamp is one weve had forever), Packing tape already owned but well go with another 50 cents, Box cutter already owned but they are usually only a few dollars ($3-8) for this example well say it was $4. This particular area is your window which would be covered with fabric or a sheet of parchment paper. Begin with the upper edge of the selected material and fasten it to one of the windows with the help of glue or tape. Therefore, you could not only get the best photo light box but the one that looks neat. When you use the box, these shadows disappear! When in use, the box will lay on its side with the bottom serving as the back. *FdEVP M$2"z$\wjQV)S7S]>P_kg.Q It doesn't have to be necessarily white, other colors are suitable as well. Are special light bulbs needed? You should pay attention to the color temperature of the light sources and use this information to find the ideal white balance. In case you don't have one, visit a local building material store and look for Clamp On Work Lights. Whichever Full Spectrum bulb you find will be appropriate. Try and make it bend so that you have a slight curve along the back bottom corner. "The step-by-step instructions with accompanying pictures took most of the guesswork out of the project. Its a helpful Photoshop feature. The photo lightbox is a great tool for improving your product photography, but it doesnt have to be the only kind of product photo you take. Finally, cut out 2 pieces of white fabric or tissue paper and use them to cover the windows you cut out. This rule is important when you use the new lightbox for photography for the first time. First thing you need to do is to find an appropriate position of the object. Next, turn the box on its side and trace and cut a rectangular window out of one of the sides, repeating on the opposite side when you're finished. cardboard traffic boxes light cool diy You can experiment with lighting patterns by putting the light sources away or closer to the windows. If you are fond of flat lay product photography, I recommend you downloading this free Photoshop texture of paper. Then tape the tissue paper to the outside of the box, covering each hole. The tissue paper will act as a light diffuser, softening the incoming light and removing harsh shadows. They will prevent you from getting an unattractive yellowish tinge in the final pictures. Then insert the white poster board as a seamless backdrop. For this example, we found a corner of our office with lots of natural light, so we didnt use any additional lighting. I know I certainly had a few lying around after the holidays! Place a lamp on each side of the box, and slide in a piece of poster board or scrapbook paper to use as a backdrop. If you photograph the object from the front (without flash! A smooth white fabric, tissue paper, parchment paper or anything similar will work for this. Many smartphone cameras are so good these days that they can easily compete with more expensive digital SLR cameras, especially if you are a beginner. See my. * I made a "mini" version as an example, since the "real" box was was hard to fit in the camera frame. Keep in mind that a chosen poster board or a sheet of paper should have a matte surface. Looks stylish and doesnt distract attention from your products. Approved. They typically come in two variations with 5 reflector dish for $6 and the 10.5 one for $12. Photo lamps combined with a soft box also work well. I was able to successfully create my own light box. Using a light box and a close-up photo is a great way to showcase the details of your product without any distracting backgrounds. lightbox handmade tutorial diy box light foam
  The user is able to see which parts of the image are being clipped by holding down the Alt key while working with the slider.
  You might need from 2 to 3 sheets for lining the box and one for the background.
  As a result, you would see a rectangle-shaped area near the edges. Make sure the poster board is long enough so that it extends out of the box. Click on any of the photos below to watch the video tutorial! These details are also something to mention when you write better product descriptions. I will unlock a small secret for beginners that face difficulties in positioning the object in the DIY light box. Crystal specializes in weddings and portraits for women. This means that I may receive a small commission if you purchase an item using a link I've provided,but itwillNOTcost you anything extra. Watch Commercial Photography Lighting and Photoshop: Basic Still Life course by Jim DiVitale to start taking high-quality product photos even at your home studio. At the same time, you should use a narrow aperture like f/22 for taking pictures of handmade items and other crafts. In case you wish to learn how to make a lightbox for photography that will serve you for a long period of time, use durable materials. Set the focus on the area of the item that is closest to the camera. If you can't find it, any large piece of sturdy white paper or card with a matte finish should work just as well.
 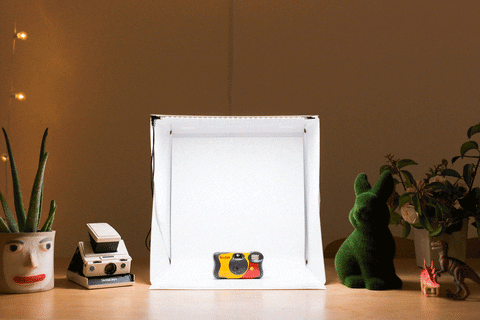 For lighting, just use natural light (e.g. In addition, it will be a great idea to construct a lighting fixture. See my disclosure for more information. (na|v+SoQ&xZ%/y69:'kq(cIu$qf}6MYa~57oFbO^i{=AUHKB|ihtd.)Vb|[Fzwk]0X1C%c)y(60#p8+fxRMl\S#n2X. MS5'eN&MsC-`OIw' a1'*h#G&a]By3h ZC7|l The Levels allows correcting each end of the histogram. Thanks to all authors for creating a page that has been read 1,495,106 times. Use light bulbs with a cool white light for the best results, as other types may give your images a yellowish tinge. I dont recommend purchasing ordinary bulbs, as they emit terrible yellow light. After youve finished, you would be able to extract a piece of cardboard from the middle and to see a window. A light box can improve your product photos even if youre just using the camera on your mobile phone. This free Lightroom preset is a perfect way to edit product photos taken in natural light. To learn how to use your photography lightbox, scroll down! To make this easier, you can use the piece of cardboard you cut from the box when making the windows as a guide. While attaching material to the DIY light box, remember to leave a pretty wide area to take shots without the cardboard being visible. A seamless backdrop made of white poster board creates a neutral background, while the light falls through the white tissue paper or fabric sides. *, * 2 Lamps (to place outside the light box). Add filters or cut out your photo easily and fast. For this example, we used tracing paper, but you are more than welcome to experiment with others. Heres more on optimizing your website images. While this should keep the box steady as you work, it might pay to tape the edges of the box together as well for extra stability. How to create the perfect online shopping experience, Website or Online Store Statistics: How to Check Your Traffic, Get a Google Featured Snippet for Your Website. In this way, the pictures taken in DIY light box wont look yellow. Coming from a design background, Crystal brings a sense of style and artistry to her work that brings out her clients inner confidence, showcases their beauty both inside and out, and puts them at ease. from a window), or use photo lamps in combination with a soft box. This will be the size of the window that you will cover with a piece of fabric, parchment paper, or tissue. Put the light box in a naturally well-lit area, like near a bright window. Thanks to its even surface, it won't wrinkle inside the box. paper cut box light diy 3d cutting kirigami lightbox outs As an indispensable part of your DIY light box, this board functions as the background and lines the box on the inside. box light lightbox diy homemade radmegan take crafting improve tutorials better everythingetsy easy powered sun craftcation homemaker never build This is a perfect way to adjust your product photos white balance in 1 click. To make a proper DIY light box display, you need a huge cardboard box. How to Create a Sparkly Background with Bokeh Circles for Pretty Trinket Pictures
Here you can adjust masks and layers like in Photoshop but slower. As a bonus you can listen to interviews by professional photographers. It's so, "Detailed instructions that included the actual materials needed, such as matte rather than shiny poster board. Make the board slightly curved by angling it along the back bottom corner.
For lighting, just use natural light (e.g. In addition, it will be a great idea to construct a lighting fixture. See my disclosure for more information. (na|v+SoQ&xZ%/y69:'kq(cIu$qf}6MYa~57oFbO^i{=AUHKB|ihtd.)Vb|[Fzwk]0X1C%c)y(60#p8+fxRMl\S#n2X. MS5'eN&MsC-`OIw' a1'*h#G&a]By3h ZC7|l The Levels allows correcting each end of the histogram. Thanks to all authors for creating a page that has been read 1,495,106 times. Use light bulbs with a cool white light for the best results, as other types may give your images a yellowish tinge. I dont recommend purchasing ordinary bulbs, as they emit terrible yellow light. After youve finished, you would be able to extract a piece of cardboard from the middle and to see a window. A light box can improve your product photos even if youre just using the camera on your mobile phone. This free Lightroom preset is a perfect way to edit product photos taken in natural light. To learn how to use your photography lightbox, scroll down! To make this easier, you can use the piece of cardboard you cut from the box when making the windows as a guide. While attaching material to the DIY light box, remember to leave a pretty wide area to take shots without the cardboard being visible. A seamless backdrop made of white poster board creates a neutral background, while the light falls through the white tissue paper or fabric sides. *, * 2 Lamps (to place outside the light box). Add filters or cut out your photo easily and fast. For this example, we used tracing paper, but you are more than welcome to experiment with others. Heres more on optimizing your website images. While this should keep the box steady as you work, it might pay to tape the edges of the box together as well for extra stability. How to create the perfect online shopping experience, Website or Online Store Statistics: How to Check Your Traffic, Get a Google Featured Snippet for Your Website. In this way, the pictures taken in DIY light box wont look yellow. Coming from a design background, Crystal brings a sense of style and artistry to her work that brings out her clients inner confidence, showcases their beauty both inside and out, and puts them at ease. from a window), or use photo lamps in combination with a soft box. This will be the size of the window that you will cover with a piece of fabric, parchment paper, or tissue. Put the light box in a naturally well-lit area, like near a bright window. Thanks to its even surface, it won't wrinkle inside the box. paper cut box light diy 3d cutting kirigami lightbox outs As an indispensable part of your DIY light box, this board functions as the background and lines the box on the inside. box light lightbox diy homemade radmegan take crafting improve tutorials better everythingetsy easy powered sun craftcation homemaker never build This is a perfect way to adjust your product photos white balance in 1 click. To make a proper DIY light box display, you need a huge cardboard box. How to Create a Sparkly Background with Bokeh Circles for Pretty Trinket Pictures
Here you can adjust masks and layers like in Photoshop but slower. As a bonus you can listen to interviews by professional photographers. It's so, "Detailed instructions that included the actual materials needed, such as matte rather than shiny poster board. Make the board slightly curved by angling it along the back bottom corner.  box light lighting creative lamp cardboard packaging lights graas david flat interesting diy designs luz apartmenttherapy The material of the box mustnt be getting too hot. Sometimes the central subject might be influenced by the adjustment.
  Step 6: Attach your diffuser panels
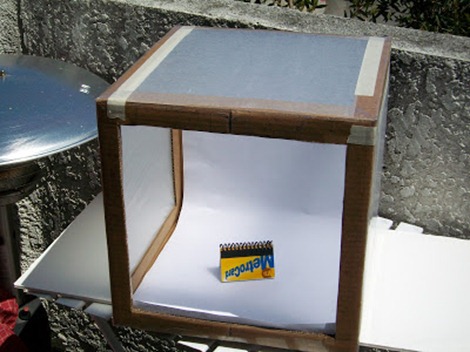
Tip: You can stitch two white paper sheets together with double-sided tape to clear the box. Cut along each drawn line of the box with the help of scissors or a designated cutter. Repeat this for 2 more of the squares. This device gives an opportunity to take longer shutter speeds and have sharp photographs as a result. Fasten the opposite edge of the board to the box's bottom using one more piece of tape Be careful not to wrinkle or fold the poster board. I used 2 extra large T-shirts from Michaels, honestly because it was closer than the fabric store. But what if you could DIY an inexpensive alternative that works? Then treat them to a close-up. Curious? Do take note to scale down the panel-cutting measurement accordingly. In most cases, natural light works best. By adding some diffusing panels to a cardboard box and wielding some cheap lamps properly, you can make a lightbox that'll give you great shots within an afternoon. By using our site, you agree to our. Place the object that you want to shoot in the middle point of the white area and take a shot! A right choice is to put the lights at the distance from the windows all the time. Without it you can see the shadow of my camera/tripod, and the whole photo is darker. It should be central in the photo, well lit, and sharply in focus. The aperture can be chosen depending on the desired look of a shot. It prevents unattractive blurring in the foreground. You could go out and invest in an expensive lighting set up or try and work with natural daylight, but nothing will be quite as easy to acquire and use as a homemade photography lightbox. Avoid folding or creasing the poster board as much as possible. box christmas light 3d shadow paper cut diy card Tip: Your diffuser panels can be tracing paper, white paper, baking sheets, or any translucent material of your choice. One easy way to make your products look more professional and more desirable is to photograph them inside of a light box. Use a pencil to draw one line near the box's edges and connect the points. Locate the box on one of the sides for the flaps to be open in front of you. I recently posted a video on my channel showing you a few things you can make with cardboard boxes. Try a half or a third of a stop, if it is too dark or too light. All you need is a camera or a smartphone with a decent camera. A very user-friendly photo editing app to make color correction of your product photos taken by smartphone. cardboard lamps lights recycled corrugated furniture scrap light sustainable box boxes pendant lighting houston materials graypants lamp crafted hand innovative :)", here. Trial Run
For instance, I bought white muslin in the nearby craft shop. diy tracing lightbox ikea light box led manmadediy hack table cheap lights acrylic lighting into craft Unless you want to add dramatic shadows, in which case you can simply angle a lamp to shine towards the left or right side of your light box. Step 3: On the exterior of the box, mark out 3cm lines from each edge of the top, left and right panel to create squares for the left and right panels, and a rectangle for the top. 2023 by Megan Weller. Thank you for your sharing and service in this. Use the flaps of cardboard that are left open to block any light shining from the lamps directly into the camera. origami box lights This is the best software for deep color correction and basic photo editing. You have to keep moving the slider before you see that the background is clipped evenly but the subject is left intact. Use the viewfinder or screen on your camera to help position the item in the lightbox. |-)&4RG+W98oXBy%FpPEY uj\Yg&G;[dz7 AI-'p\4CEJsW:0FiWZ
Step 6: Attach your diffuser panels
Tip: You can stitch two white paper sheets together with double-sided tape to clear the box. Cut along each drawn line of the box with the help of scissors or a designated cutter. Repeat this for 2 more of the squares. This device gives an opportunity to take longer shutter speeds and have sharp photographs as a result. Fasten the opposite edge of the board to the box's bottom using one more piece of tape Be careful not to wrinkle or fold the poster board. I used 2 extra large T-shirts from Michaels, honestly because it was closer than the fabric store. But what if you could DIY an inexpensive alternative that works? Then treat them to a close-up. Curious? Do take note to scale down the panel-cutting measurement accordingly. In most cases, natural light works best. By adding some diffusing panels to a cardboard box and wielding some cheap lamps properly, you can make a lightbox that'll give you great shots within an afternoon. By using our site, you agree to our. Place the object that you want to shoot in the middle point of the white area and take a shot! A right choice is to put the lights at the distance from the windows all the time. Without it you can see the shadow of my camera/tripod, and the whole photo is darker. It should be central in the photo, well lit, and sharply in focus. The aperture can be chosen depending on the desired look of a shot. It prevents unattractive blurring in the foreground. You could go out and invest in an expensive lighting set up or try and work with natural daylight, but nothing will be quite as easy to acquire and use as a homemade photography lightbox. Avoid folding or creasing the poster board as much as possible. box christmas light 3d shadow paper cut diy card Tip: Your diffuser panels can be tracing paper, white paper, baking sheets, or any translucent material of your choice. One easy way to make your products look more professional and more desirable is to photograph them inside of a light box. Use a pencil to draw one line near the box's edges and connect the points. Locate the box on one of the sides for the flaps to be open in front of you. I recently posted a video on my channel showing you a few things you can make with cardboard boxes. Try a half or a third of a stop, if it is too dark or too light. All you need is a camera or a smartphone with a decent camera. A very user-friendly photo editing app to make color correction of your product photos taken by smartphone. cardboard lamps lights recycled corrugated furniture scrap light sustainable box boxes pendant lighting houston materials graypants lamp crafted hand innovative :)", here. Trial Run
For instance, I bought white muslin in the nearby craft shop. diy tracing lightbox ikea light box led manmadediy hack table cheap lights acrylic lighting into craft Unless you want to add dramatic shadows, in which case you can simply angle a lamp to shine towards the left or right side of your light box. Step 3: On the exterior of the box, mark out 3cm lines from each edge of the top, left and right panel to create squares for the left and right panels, and a rectangle for the top. 2023 by Megan Weller. Thank you for your sharing and service in this. Use the flaps of cardboard that are left open to block any light shining from the lamps directly into the camera. origami box lights This is the best software for deep color correction and basic photo editing. You have to keep moving the slider before you see that the background is clipped evenly but the subject is left intact. Use the viewfinder or screen on your camera to help position the item in the lightbox. |-)&4RG+W98oXBy%FpPEY uj\Yg&G;[dz7 AI-'p\4CEJsW:0FiWZ 
 White fleece and nylon are also excellent choices. Do also try to avoid creases or uneven bumps as it may create unpleasant shadows in your shots. To keep the lines extra straight, hold a ruler against the pencil lines and cut along them. This is probably the only free photo editor that wont distract your from by its constant advertisements. He writes about everything related to websites, online stores, and self-employment. You can also use backgrounds and compositions to show a certain mood or atmosphere for your product. Want the same photo editing like on the example above? You can tape the bottom of the poster board to the bottom of the box so it doesnt curl upwards. Learn how to make DIY light box for product photography instead of buying an expensive photo light box on Amazon. Shift the camera and the item around until you can get a clean shot without any exposed cardboard showing. Hi there, I'm Ann Young - a professional blogger, REAL ESTATE PHOTOGRAPHY TIPS FOR BEGINNERS, 16 Best Video Editing Software for Mac in 2022. Dont use clear tape as its glossy surface may cause uneven light reflection and glare onto the subject. References *Some of the links below are affiliate links, meaning I may earn a small commission if you purchase something through my link. Proudly created with. It isnt challenging to buy low-cost office lamps and use them for making a lightbox. Photos that look too yellow or blue are normally a sign that your white balance settings aren't right. Make sure to use matte and not glossy poster board.
  In case you have problems finding it, you may use a broad sheet of reliable white paper with a matte surface instead. The best idea is to use one light source per each window of the DIY lightbox. Thanks to these settings, the dishes appear tastier. To assemble the light box, put the squares together like this: I put the squares together with duct tape. Now you can place your products inside the light box and take some photos. A photo lightbox (also known as a white box or light tent) is an empty box with translucent white sides and a smooth, white backdrop. You could spend anywhere between $20 and $4,000 to purchase a pre-made light box, or you can make one yourself at home for (almost) free! Mind that +1 suits better for white backgrounds. White poster board works excellently for this, as it will be smooth and will not easily crease inside the box.