Load the mat into your machine and press GO! You should then select flannel as your material setting. The rotary blade started to cut/dig into my mat. Want in? document.getElementById( "ak_js_1" ).setAttribute( "value", ( new Date() ).getTime() ); This site uses Akismet to reduce spam. My machine was finished cutting after the 8th pass! I will be making a foam piece to fit inside this drawer so myCricuttools can be stored nicely in there and not move around when I open and close it. I used a frame that was meant to hold 10 (46) pictures. Now, I can utilize this great extra storage space, and my tools do not get knocked around. Carefully remove the cut pieces from the mat. There are many organization ideas out there my idea being just one of them! The Dollar Tree foam sheets did work, but it was a bit more work. Save my name, email, and website in this browser for the next time I comment. jennifermaker tubes Theyre very cute, but just not practical for me. It is really easy for you to take some materials you have at home and make your own version of this DIY Cricut Tool Holder Organizer Frame. Attach it to the chip board with the other foam layers, align your edges. Use masking tape to attach the Chipboard to your mat. If you also plan on doing this, then cut your cardstock with the white layer design. I had better success cutting the foam if I placed toward the middle of my mat. If you have a fresh new green mat, it might be sticky enough. We just moved a few months ago and now that I have an office on my main floor; my Cricut gets more attention than it did in the basement of my old house. For the 2nd group to cut, duplicate the group with the tool shape cut outs, then place the solid rectangle below. Take my failures $$ and learn from them by just getting this size the first time! Hi, Im JoAnna, thanks for stopping by! So You Got A Cricut Machine For ChristmasNow What. But when you are looking for the hooks just take the product number I provided along with you to make sure theyre the right ones. Keep reading for the full tutorial + a video! One day the organization idea hit to take an old picture frame I had laying around and DIY a Cricut Tool Organizer rather than buying the materials to make those popular Peg Board Tool Hangers I have seen around Pinterest. Explore 3 For Home Organization Labels, The Top 10 Cricut Beginner Questions: Answered. LOL. I used Elmers glue to attach my cardstock to my foam sheets. It should be quick to do, super affordable and fun to make this handy organizer! Lets start from the bottom up. Go back to the CANVAS screen and and hide all the layers except for the solid rectangle with finger holds, were going to cut just this piece out of 2mm Chipboard or whatever other stiff material you have selected. After a few passes, press the PAUSE button on your machine to check the progress of your cut. If you choose to use the Dollar Tree or other smaller foam sheets like I did, then I recommend placing them on your cutting mat so that the first foam sheet ends just shy of the4 inchmark. My name is Lela, (say it like LEE-luh) and I'm so glad you stopped by my blog! I decided to use my green mat. I noticed when I clicked make it, the pieces are not in the same order. I dont have a pretty little workspace like you see all over Pinterest. For the 2nd layer that hold the blades, I applied glue to the chip board first, spread out the glue into a thin layer with the paintbrush. Customize it to your liking with paint colors, # of hooks for your tools, and backdrops! I only have one Strong Grip mat, so Im going to do it one mat at a time. Im always learning new things and want to share some of that info with you. The best part about it is just how Im Amy, the mom behind the scenes. If you have any questions, feel free to ask in the comments section. Make sure to line up your edges while the glue is still wet. Hi Everyone! The new tool holders that Cricut made for holding tool housings and tips if you havent seen one before they are pretty cool! Take your picture frame remove all the glass and picture mats from it. Now were going to assemble all of our cut pieces. This part took me some time because I was working with two pieces trying to make the patterns match up in the direction I wanted them. This seemed to be the best placement for the transition to the new foam sheet. If its not cut all the way, press the GO button again and let it do a few more passes. I did a terrible job of this and wish I would have measured better. ), Glue I used some general all purpose craft glue that dries clear. Attach the 2nd piece of foam to the mat, making sure your cut lines fall within the taped edges. pay attention to how you assemble your foam sheets, because if you flipped them like I did, then you will need to mirror your cardstock before you cut it. I added random small items on my desk on top of my foam layers to help hold them in place as they dried. Select 2mm Chipboard from your materials (or whatever material you are using). 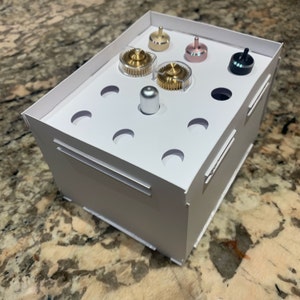 Copyright 2022, JoAnna Seiter. For a generic pattern this part would go really quick! jennifermaker You can also click this link: https://design.cricut.com/landing/project-detail/5fbb9a0ecb46d210ccf4bcb6. My pink mat, which is what you should use your rotary blade on is very sticky. Ive been buying a lot of clear acrylic storage bins on Amazon to help organize my stuff. No need for the 24 passes my machine wanted make, it would have cut clear through my mat! I then let this all dry before putting it in place or adding any of my tools to it. For the 1st group to cut, duplicate the group with the tool shape cut outs (you will now have 2 of these showing) place the solid rectangle with finger holds below. Small Clear Command Hooks in the 0.5lb weight (17505CLR-DBEF) : I tried SEVERAL different types of hooks before I found the perfect sized ones for holding the Cricut Tools. craftingintherain chipboard The side that was cut on will have small lines from the rotary blade. ( Im guessing these people dont have cats or dust in their house.). Lay out your tools on the frame surface to figure out their heights. Whether you're into organizing, home improvement, crafts, or you just think my pets are cute, you'll find all kinds of inspo here. Im using the solid rectangular piece of foam for a little padding in the bottom layer. jennifermaker Place one of the foam sheets centered on the mat. That way you will be sure they are the perfect ones for this project. Cutting corrugated Cardboard with the Cricut Maker Knife Blade, How to make a Magical Unicorn Pop-Up Card, How to Create Custom Pressure Settings in Cricut Design Space. Then I placed the solid foam rectangle with the finger holds on top of the glue. Select the top most layer and click UNGROUP. Load the Deep Cut Blade or the Knife Blade into your machine. So, I thought it would be a good idea to use a less sticky mat. Log in, Cricut scraper, tweezers, and weeding tools, packs of non-Cricut brand blades on Amazon, https://www.minordiy.com/cutting-cardboard-cricut-knife-blade/, Crafting Supplies Heart | Maggie Rose Design Co, DIY Sharpie Marker Holder for your desk Minor DIY. I also used a paper towel to wipe off any extra glue that seeped through. This just makes it look nicer. Im also sharing the template that I made for FREE! Place your foam and chipboard piece under a heavy book overnight to flatten it out. I used some leftover, I had this wallpaper leftover from my Pantry Makeover Project (Tutorial coming soon!!!!
  Did you know the bottom piece of yourCricutMaker opens up and is a drawer? Learn how your comment data is processed.
  Learn how your comment data is processed. The first layer is gray, then blue, green, red, orange, yellow, and the last most top layer is the white. In the machine itself: I know that the Cricut Maker does have a section designed to allow you to store your wedding tools and a couple of blades; upright in special little pockets built into the side of the machine. I did not use this storage before because I did not like hearing my tools shift around as I opened and closed my machine. Then apply glue to back of the one of the foam pieces with the cut outs for the blade housings, quick swap tips, and extra blades. I started gluing the bottom layer first and worked my way up to the top. When you cut out your foam sheets it is best to use your rotary blade, this should have come with theCricutMaker. When the glue was still wet sometimes the layer below would move when I moved the top layer. You can also store the blades in the front flap of the machine, but I know myself, and I will forget to take out all the blades/ tools I need for a particular project before I start my machine. They MUST have a lid to help keep the dust out and they have to fit in one of the cubbies at them end of my work desk. Select the 2nd mat and move those pieces toward the middle of the mat also. It is recommended to use foam sheets that are at least 48.5 inches (a little bigger is better) and 2mm thick. Yes, I know Cricut has their own round organizer, I almost bought it. Move the piece slightly away from the edges of the mat.
  2mm Heavy Chipboard or other stiff material for backing, a paintbrush you dont care about ruining to apply glue. Add your tools onto the frame and hang on the wall or set up on your desk. If you have any questions at all please let me know in the comments below! My first cut was on my green foam sheet, which I just laid both foam sheets long ways. It did not take too much time to make and the cost was minimal. document.getElementById( "ak_js_1" ).setAttribute( "value", ( new Date() ).getTime() ); This site uses Akismet to reduce spam. Keep the back of the picture frame. I just laid it in the bottom of the acrylic box, no glue or anything. Once your foam and chip board piece is flattened out, you can add your tools and blades! Attach it to the chip board with the other foam layers, align your edges. Many parents are choosing to go with a more Neutral Nursery Feature Wall these days, especially since the baby room is often used again for future children. You can read our full disclosure policy here. For myself, counting only the materials I actually used it costed roughly. There was one section that was just barely hanging on. 2mm 9x12 Foam Sheets (at least 2 sheets) Im using black, but you can use any color. Some professional organizers tell you collections, 5 Easy Car Cleaning Hacks with @HARTtoolsUSA [AD], SAVE THIS if you dont already have a cleaning s, Stop putting so much pressure on yourself. If the frame has a smooth surface I recommend scuffing it up a bit with some sandpaper for better paint adherence, Spray paint frame in desired color/colors. If you buy bigger foam sheets you will not need to worry about this. Every Saturday morning I send out a weekly recap of all the new blog posts. Get organized for completing this project before you get started with the Crafting and DIY Project Planner, Neutral, Foliage Themed Board and Batten Baby Nursery Feature Wall, 3D Growth Chart Ruler: DIY lifesize ruler at home to track precious memories, IKEA DUKTIG Play Kitchen Makeover Tutorial, Pegboards: people use framed pegboards to hang weeding tools, brayers, scrapers, and other cutting tools (such as rotary blades, rulers, precision knives, etc).
 Copyright 2022, JoAnna Seiter. For a generic pattern this part would go really quick! jennifermaker You can also click this link: https://design.cricut.com/landing/project-detail/5fbb9a0ecb46d210ccf4bcb6. My pink mat, which is what you should use your rotary blade on is very sticky. Ive been buying a lot of clear acrylic storage bins on Amazon to help organize my stuff. No need for the 24 passes my machine wanted make, it would have cut clear through my mat! I then let this all dry before putting it in place or adding any of my tools to it. For the 1st group to cut, duplicate the group with the tool shape cut outs (you will now have 2 of these showing) place the solid rectangle with finger holds below. Small Clear Command Hooks in the 0.5lb weight (17505CLR-DBEF) : I tried SEVERAL different types of hooks before I found the perfect sized ones for holding the Cricut Tools. craftingintherain chipboard The side that was cut on will have small lines from the rotary blade. ( Im guessing these people dont have cats or dust in their house.). Lay out your tools on the frame surface to figure out their heights. Whether you're into organizing, home improvement, crafts, or you just think my pets are cute, you'll find all kinds of inspo here. Im using the solid rectangular piece of foam for a little padding in the bottom layer. jennifermaker Place one of the foam sheets centered on the mat. That way you will be sure they are the perfect ones for this project. Cutting corrugated Cardboard with the Cricut Maker Knife Blade, How to make a Magical Unicorn Pop-Up Card, How to Create Custom Pressure Settings in Cricut Design Space. Then I placed the solid foam rectangle with the finger holds on top of the glue. Select the top most layer and click UNGROUP. Load the Deep Cut Blade or the Knife Blade into your machine. So, I thought it would be a good idea to use a less sticky mat. Log in, Cricut scraper, tweezers, and weeding tools, packs of non-Cricut brand blades on Amazon, https://www.minordiy.com/cutting-cardboard-cricut-knife-blade/, Crafting Supplies Heart | Maggie Rose Design Co, DIY Sharpie Marker Holder for your desk Minor DIY. I also used a paper towel to wipe off any extra glue that seeped through. This just makes it look nicer. Im also sharing the template that I made for FREE! Place your foam and chipboard piece under a heavy book overnight to flatten it out. I used some leftover, I had this wallpaper leftover from my Pantry Makeover Project (Tutorial coming soon!!!!
 Did you know the bottom piece of yourCricutMaker opens up and is a drawer? Learn how your comment data is processed. Learn how your comment data is processed. The first layer is gray, then blue, green, red, orange, yellow, and the last most top layer is the white. In the machine itself: I know that the Cricut Maker does have a section designed to allow you to store your wedding tools and a couple of blades; upright in special little pockets built into the side of the machine. I did not use this storage before because I did not like hearing my tools shift around as I opened and closed my machine. Then apply glue to back of the one of the foam pieces with the cut outs for the blade housings, quick swap tips, and extra blades. I started gluing the bottom layer first and worked my way up to the top. When you cut out your foam sheets it is best to use your rotary blade, this should have come with theCricutMaker. When the glue was still wet sometimes the layer below would move when I moved the top layer. You can also store the blades in the front flap of the machine, but I know myself, and I will forget to take out all the blades/ tools I need for a particular project before I start my machine. They MUST have a lid to help keep the dust out and they have to fit in one of the cubbies at them end of my work desk. Select the 2nd mat and move those pieces toward the middle of the mat also. It is recommended to use foam sheets that are at least 48.5 inches (a little bigger is better) and 2mm thick. Yes, I know Cricut has their own round organizer, I almost bought it. Move the piece slightly away from the edges of the mat. 2mm Heavy Chipboard or other stiff material for backing, a paintbrush you dont care about ruining to apply glue. Add your tools onto the frame and hang on the wall or set up on your desk. If you have any questions at all please let me know in the comments below! My first cut was on my green foam sheet, which I just laid both foam sheets long ways. It did not take too much time to make and the cost was minimal. document.getElementById( "ak_js_1" ).setAttribute( "value", ( new Date() ).getTime() ); This site uses Akismet to reduce spam. Keep the back of the picture frame. I just laid it in the bottom of the acrylic box, no glue or anything. Once your foam and chip board piece is flattened out, you can add your tools and blades! Attach it to the chip board with the other foam layers, align your edges. Many parents are choosing to go with a more Neutral Nursery Feature Wall these days, especially since the baby room is often used again for future children. You can read our full disclosure policy here. For myself, counting only the materials I actually used it costed roughly. There was one section that was just barely hanging on. 2mm 9x12 Foam Sheets (at least 2 sheets) Im using black, but you can use any color. Some professional organizers tell you collections, 5 Easy Car Cleaning Hacks with @HARTtoolsUSA [AD], SAVE THIS if you dont already have a cleaning s, Stop putting so much pressure on yourself. If the frame has a smooth surface I recommend scuffing it up a bit with some sandpaper for better paint adherence, Spray paint frame in desired color/colors. If you buy bigger foam sheets you will not need to worry about this. Every Saturday morning I send out a weekly recap of all the new blog posts. Get organized for completing this project before you get started with the Crafting and DIY Project Planner, Neutral, Foliage Themed Board and Batten Baby Nursery Feature Wall, 3D Growth Chart Ruler: DIY lifesize ruler at home to track precious memories, IKEA DUKTIG Play Kitchen Makeover Tutorial, Pegboards: people use framed pegboards to hang weeding tools, brayers, scrapers, and other cutting tools (such as rotary blades, rulers, precision knives, etc).